Pages

Monday, 29 April 2013

Stroller seat covers - bound button holes (outer fabric)

So I have the fabric and the pattern - now to make a start!
I measured out the pattern and marked out where all the button holes were.

To make it even more comfy - I cut out a layer of batting and sewed it to the top piece of fabric. Now, here's where you have a choice - easy, peasy option or the sewing challenge. Option 1 - easy peasy...
Sew the button holes using the button hole stitch on your sewing machine. See - it's a great option and good enough for the people at Phil and Teds....
My Phil and Ted's store bought cover - regular button holes
Now I could have chosen a regular button hole, but I didn't - I chose to do a bound button hole!

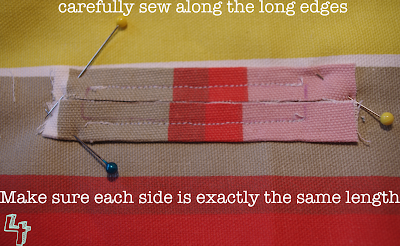
I love a bound buttonhole - it adds a certain amount of class to an outfit and makes it scream "couture". These days you are hard pressed to find these little beauties so here's how to make them yourself. A little bit fiddly and a bit more work than a regular button hole but, so worth it!


So that's how you do the outer fabric. Next time we will do the lining - think I need a cup of tea after all that!!



Friday, 19 April 2013

Stroller seat cover - Pimp my Ride Mum!

I bought a new stroller. So what, I hear you say. Well, it's actually my 4th stroller. I only have two kids - 2 strollers each - are you mad! My husband thinks I am - he jokes that we are running a stroller breeding program. It all started when I had baby E. I was really happy with my old stroller for Miss S - a Mountain Buggy Swift - loved, loved, loved it! The only downside was that it only takes one child! So began my stroller journey. Who thought that a light weight, easy to use, tandem stroller would be so hard to find? Anyway, 4 strollers later I now have a Phil and Teds. Looks great - all it need now is some fab new stroller seat liners.


How great is this fabric - Miss S thinks it's pretty, I tend to agree.

Check out my pattern here

It fits a Phil and Ted's seat but I tried it on my Mountain Buggy and it works for that as well. I am thinking bound button holes and pretty binding - a bit over the top I know but hey, when you find the right stroller I say celebrate!


Monday, 15 April 2013

Nappy change wallet

Have you ever tried flying on an aeroplane by yourself with two small children? Let me tell you - I think that you need about 6 pairs of hands and 3 pairs of eyes to keep it all under control. Not to mention being super organised! Well, the last time I travelled by myself with my two small girls I was neither prepared nor organised. I left things at home, meaning we had to turn around before we even got to the airport, then, I left bags in the car when I went to check-in and I dragged myself higglydy pigglydy through airport security - yes I was the one with 4 of those grey tubs filled with random things while baby E was being nursed by patient security guards. Anyway, in my airport check-in mess I managed to lose my nappy change wallet. So, I decided when I got home to make one using this great tutorial. I changed a few things - namely I placed the pockets opposite one another so I could sandwich some travel wipes in there; I used some lovely spotty oilcloth on the inside; plus, I finished the whole mat with some piping - who doesn't love piping! I am happy with the results and I promise to be more organised next time I fly!